New Bethesda location coming soon!

CHP-Bethesda is getting bigger and better!

I am so excited to finally tell you about our new physical therapy and sports performance facility in Bethesda. We are moving 2 miles down the road to 5272 River Road.

You may wonder why we moved so soon after opening our McLean facility.

Our new 3100-square-foot, state-of-the-art facility will allow us to have a sports performance center and physical therapy clinic. This will help us to continue our mission of helping active people like you conquer injury while providing opportunities to train in a setting like none other.

This amazing new facility is being built and is expected to open in mid-November.

Stay tuned for updates on our grand opening and all of the new services we will be providing at the new and improved CHP Bethesda!

P.S – If you need help with something now, we have openings available!

Fitness watches: what stats should you care about?

Dr. Kelly Henry here. I work with lots of runners in McLean as physical therapy and performance training clients. We all know a runner who is obsessed with their watch, and with all the technology these days, your fitness watch can tell you just about anything.

This is informative and overwhelming at the same time.

So many statistics are provided, but how many of them are relevant? And if they are relevant, what do they mean? After doing a deep dive into my own watch (a Garmin Venu Square), and some market research on other running watches’ statistics, here is what you should care about:

Resting heart rate 

What this means: How fast your heart beats when you are not doing any activity.

Why you should care: A normal heart rate ranges from 50-100 beats per minute, but more importantly, your watch is learning what is normal for you. Fitness watches usually do a good job of tracking this. Knowing your resting heart rate is a good indicator for helping you determine what your heart rate should be when you’re exercising. A raised heart rate can indicate a number of things, but regarding your training, it can indicate overtraining and a lack of recovery.

Heart rate zones 

What this means: Most fitness trackers divide your heart rate into Zones 1-5. These are determined based on your resting heart rate and a hypothetical maximum heart rate derived from a standard calculation.

Why you should care: You can use your heart rate zones to guide the intensity of your training. Most of your workouts should be performed in Zones 2-4. If you are performing cardiovascular exercise, exercising in Zones 1-3 will provide more of an aerobic benefit (lower intensity, longer duration), whereas Zones 4-5 should focus more on anaerobic systems and power development (fast runs, sprints, or interval training). If you aim to address certain improvements (speed vs. endurance), using heart rate zones can be a great objective way to determine how to adjust your perceived effort. Keep in mind heart rate can be impacted by other factors, including heat and time of training.

Cadence 

What this means: Simply put, cadence is how many steps you are taking in one minute. Aka, how fast your feet are moving.

Why you should care: Measuring cadence helps to make you aware of your stride length and energy expenditure while running. A longer stride often results in a lower cadence and vice versa. Research has shown that patients with knee pain after running often benefit from a shortened stride by increasing stride length. An ideal cadence for most people is 170-180bpm (beats per minute).

Distance 

What this means: How far you ran/walked/moved.

Why you should care: Tracking distance ensures that you are progressing your exercise appropriately and is one of the main things runners care about. While some people prefer time-based exercise, distance may be easier to track if you are working on maintaining a consistent pace. Tracking distance over time is important to ensure there is adequate training volume and can prevent over or under-training. Generally, you should aim for a ratio between 0.80-1.20 when comparing month-to-month averages. This means that the weekly average of this month’s distance is not less than 80% or more than 120% of the weekly average of last month’s distance. Your watch should calculate your weekly mileage for you! Use this mileage in the following formula:

(Week 1 distance + Week 2 distance + Week 3 distance + Week 4 distance) / 4 = Average Workload)
Then divide this number by the average workload from the previous month. This is more accurate for more experienced runners, while less experienced runners or those who run shorter distances may be able to increase their distance more liberally.

Heart Rate Variability (HRV)

What this means: The variation in time between heartbeats. Although our heartbeat is often described as a metronome, it is not. There are small differences in the intervals between each of your heartbeats, which are impacted by your sympathetic nervous system. HRV depends on multiple readings, including core body temperature, circadian rhythm, metabolism, and sleep cycle, to make the best estimate.

Why you should care: In a broad scope, increased HRV can be correlated with better aerobic fitness (if there is no underlying pathology). While it’s difficult to properly measure HRV strictly from a wearable, it can indicate training adaptations and improvements in cardiovascular health. HRV is good supplemental data but shouldn’t be the basis for any training changes since the sensitivity of this measurement is limited, and the most accurate HRV reading will come from a controlled clinical setting. Multiple comorbidities can impact HRV, including chronic pain, inflammation, insomnia, concussions, depression and anxiety, and other stress.

These 5 statistics only scratch the surface of what your fitness watch can do for you. If you are a runner searching for an advantage over your competition, schedule a consultation by replying to this email. In this consultation, she will help you determine how to use technology to your advantage and other ways to improve your performance.

What is that pinch in my hip?

Have you ever felt a pinching sensation in the front of your hip? This is one of the most common symptoms that our sports physical therapy hears from people with hip problems.

We hear about it from all ages and populations – field athletes, powerlifters, weekend warriors, etc.

Our physical therapy patients in Bethesda and McLean note that they feel an uncomfortable sensation in the front of their hip whenever they flex their leg, squat, or bear lots of weight on one side. This may happen during running, lifting weights, or getting on and off the floor.

The hip is a big, complex joint with lots of moving (and not moving) parts! “Pinching” symptoms often involve a few structures. Some to note are the hip labrum, the hip flexors, and the shape of your hip ball and socket itself. While it may be difficult to diagnose the exact cause of those symptoms, your physical therapist can perform a physical exam to differentiate what is giving you problems and how we can address this in physical therapy.

Often, it is a combination of the 3 factors above. Muscle testing, range of motion, and a deep dive into your symptoms and history inform us about the cause of your pain. Findings we see include:

1. Decreased hip flexion or internal rotation range of motion
2. Discomfort and difficulty with deep squatting or lunging
3. Weakness of the hip flexors, abdominals, or hip abductors/adductors

But why does this happen?

As mentioned, the hip is a big, complex joint supporting much of your body weight. As we move throughout the day, from walking to running to sitting to standing, our hips and pelvis adapt to the changes in the load being placed on them. Our joints are lined with cartilage that helps absorb shock and protect the joint. The muscles around our joints help to manage additional stress and decrease the amount of pressure on the joint. If one of these three pieces is affected – the hip labrum (cartilage), the hip muscles/tendons, or the bony structure of the joint itself, the other pieces will be affected as well. This can progress to labral tears, hip flexor tendinopathy, and chronic hip impingement symptoms.

In simple terms (although none of this is simple!), there is too much pressure in one spot. As physical therapists, our job is to teach you how to manage this pressure better, protect the structures that are giving you problems, and gradually progress you back to the activities that you want to do while respecting the healing process. A few interventions we use to do this are:

1. Hip range of motion drills

  1. Hip flexor/adductor isometric strengthening
  1. Dynamic hip flexion progressions

If you have been experiencing a consistent pinching sensation in the front of your hip, see a healthcare professional, preferably a sports physical therapist. These symptoms commonly become more intense and limiting over time. Contact us now for help solving your chronic hip discomfort!

What do I do if my athlete got injured?

What Should My Athlete Do After an Injury? How Can They Safely and Quickly Get Back on the Field?

To answer these questions, let’s explore the sports physical therapy process for one of the most common soft tissue injuries in soccer: a quad strain. For more details on soft tissue injuries and the differences between strains and sprains, check out last week’s article here.

Soccer players are prone to soft tissue injuries due to the sport’s high demands of sprinting, kicking, and sharp directional changes. Kicking injuries are particularly common, with the rectus femoris muscle, part of the quadriceps group, being the most frequently injured.

The rectus femoris muscle spans both the hip and knee. When an athlete winds up to kick a soccer ball, this muscle quickly stretches and contracts to execute the kick. Any muscle that repeatedly lengthens and shortens rapidly, especially across multiple joints like the hip and knee, is at a higher risk of injury.

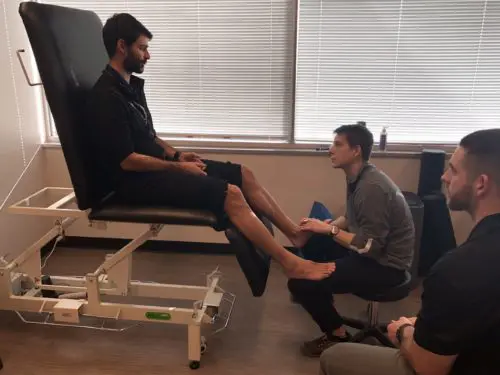
Immediately following an injury, the athlete should be evaluated by a physical therapist or sports medicine physician to assess the severity and determine the appropriate course of action. While imaging can be useful, it’s not always necessary.

The rehabilitation process for a muscle strain can be broken down into three distinct phases:

1. Injury Management Phase

The goals of this phase are to reduce pain and inflammation, restore the muscle’s range of motion, and reintroduce pain-free functional movements. While the injured tissues need time to heal, complete rest isn’t the answer. Light strengthening exercises and mobility drills are essential to stimulate the healing process, making early physical therapy crucial.

Examples of early-phase exercises for a quad strain might include:

– Isometric knee extension with hip extended

– Split squat isometric

– Single-leg bear hold

Once athletes regain a full range of motion without pain and can perform basic bodyweight movements, they move on to the next phase of rehabilitation. Unfortunately, traditional physical therapy often stops here, leaving many athletes struggling to bridge the gap between rehab and full performance.

2. Strength Training Phase

At the beginning of this phase, many athletes still face significant strength deficits.

Strength training is vital for improving the quality of the injured tissue and reducing the risk of reinjury. This is the time to hit the weight room.

Strength training exercises for an athlete recovering from a rectus femoris or quad strain might include:

– Reverse Nordic curls

– Lateral step downs

– Safety squat bar step-ups

3. Sport-Specific Training

What must the injured tissue be able to do for a safe return to sport?

This phase of rehab demands a deep understanding of the athlete’s sport, ensuring the injured area is prepared for the challenges ahead.

Since the rectus femoris is often injured due to continuous, rapid lengthening and shortening, this movement pattern must be replicated and trained during rehab to prepare the athlete for the demands of soccer.

Some examples of exercises used in this phase might include:

– Alternating split squat jumps

– Banded deceleration drills


While these three phases apply to all muscle strains, the recovery timeline varies based on factors such as the injured body part, the severity of the injury, and other individual factors.

If your athlete is dealing with a muscle strain, it’s essential to schedule an appointment with a physical therapist or sports medicine physician as soon as possible. Early treatment has been shown to get athletes back on the field faster and more effectively. If you suspect that you or your child has a muscle strain, schedule an evaluation with us right away.

The fall injuries we see in physical therapy

Are you the parent of a high school athlete? If so, you may have noticed an increase in injuries lately. At Cohen Health and Performance in McLean and Bethesda, we see many of these athletes for sports physical therapy.

While some injuries, like ACL tears, are traumatic, the most common injuries our physical therapists encounter are soft tissue strains and sprains.

Though these terms might sound similar, they refer to different types of injuries.

A strain is an injury to the muscle itself. Muscle strains often occur in the lower body during high-velocity activities like sprinting, cutting, and kicking. They can also happen in the upper body, typically from contact or a fall, though this is less common. Common lower-body muscle strains involve the hamstrings, calves, quadriceps (especially the rectus femoris muscle), and adductors.

If your athlete has strained a muscle, they will likely feel immediate pain in the affected area and describe a sensation of tearing or pulling in the muscle. Lower-body strains usually occur without contact and happen when an athlete is moving at high speed or decelerating.

A muscle strain can often be self-diagnosed at the time of injury using a few simple assessments:

– Pain when touching the injured area
– Pain when stretching the affected muscle
– Pain and/or weakness when contracting the affected muscle
– Possible bruising or discoloration of the skin over the injured area

A sprain, on the other hand, is an injury to a ligament. Common sites for sprains include the ankle and knee. A sprain occurs when a ligament is overstretched, leading to potential partial or full tears. Sprains often happen when an athlete lands awkwardly, steps on another player’s foot, or twists a limb into an unnatural position.

Similar to strains, sprains can also be self-diagnosed using these assessments:

– Pain when palpating the injured area
– Pain when moving or bearing weight on the affected joint
– Bruising and swelling in the affected area

The key difference between these two injuries is their location. Sprains are localized to joints, while strains are specific to muscles.

Future blog posts will provide examples of how you or your athlete can manage these injuries effectively.

If you suspect that you or your athlete has sustained a soft tissue injury, it’s important to have it evaluated by a physical therapist as soon as possible. We will assess the severity of the injury and provide detailed guidance on how to get back in the game as quickly as possible!

It’s an athlete’s right of passage

The first time may have happened as you landed from a jump playing basketball or making a cut while playing soccer. And since that first time, it has happened several more times.

What should you do the next time you sprain your ankle? Should you go to an athletic physical therapy clinic like ours in McLean and Bethesda?

Most likely, it will be swollen and painful, but you should be able to put some weight through it.

If you cannot put any bodyweight through your ankle, see a physical therapist or doctor immediately.

Assuming a fracture has been ruled out, it is time to start the physical therapy process immediately. The sooner you get started, the quicker you recover!

Initial goals are to reduce swelling, restore the range of motion to the ankle, and get back to walking pain-free, without a limp.

Range of motion is often restricted by joint swelling, and below are a few tips to help.

  1. Move the injured ankle through a comfortable range of motion. This can be drawing circles with your ankle, drawing out the ABCs with your ankle, or pumping your ankle up and down. The important thing is that the joint is being moved.
  2. Elevate the limb above the heart as much as possible.
  3. Perform aerobic exercise that elevates your heart rate to increase blood flow to the area, which will help clear out extra fluid in the joint. An exercise bike is recommended so that weight bearing is not an issue.

Next is strengthening.

Once you have restored the normal range of motion and can comfortably bear weight through the injured joint, it is time to start building up the ankle’s tolerance to higher loads and the demands of life/sport. This will be a combination of strengthening and balance exercises.

Here are a few exercises to help you work on strengthening and balance.

Single leg stance with rotation
Front foot elevated heel raise
Multidirectional RDL 

Finally, the fun phase. Sport-specific movements! Movements during this phase are tailored to your sport, often involving change of direction/cutting drills. Various jumping and hopping movements, called plyometrics, are also included.

Below are 2 examples of plyometrics drills we have used with our athletes.

Alternating split stance leaps
Lateral bounds
 
It is important that you feel 100% confident in your ankle before you are finished with rehab.

If you or someone you know recently sprained their ankle, reply to this email and accelerate your return to the field!

×