1 Trick to Perfect Running Foot Strike Position

If you ever experience back pain when running, are a runner that has been to physical therapy, or are curious about foot strike position, this article is for you!

One of my favorite workshops to conduct is the CHP Running Technique and Performance lab. I have a blast throughout the workshop, but the Q&A portion is my favorite. I have gotten the opportunity to answer many different questions which have forced me to expand my knowledge and has helped me to create a better workshop over time.

While the questions that I receive consistently differ, one topic remains consistent. Someone inevitably asks about foot strike position and my answer often surprises them.

There is no correct foot strike position.

Among other things, foot strike position is dependent on an individual’s body dimensions (limb length as an example) and the position of the body above.

While we cannot change your anatomy, we can change the position, aka the posture, of our bodies.

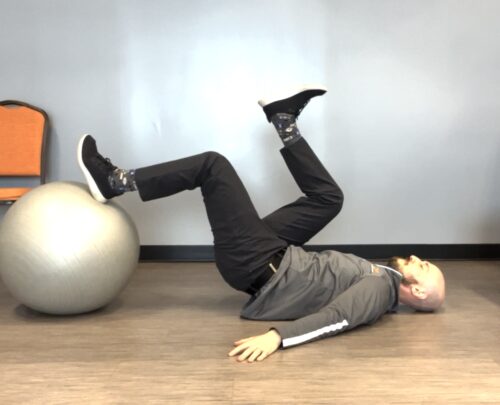
A “stacked” posture will facilitate a foot strike that occurs directly underneath the body. This foot strike position results in a more efficient stride and minimal stress to the body. To learn about the stack, check out a previous article that I wrote on Learn to Stack Like a Snowman.

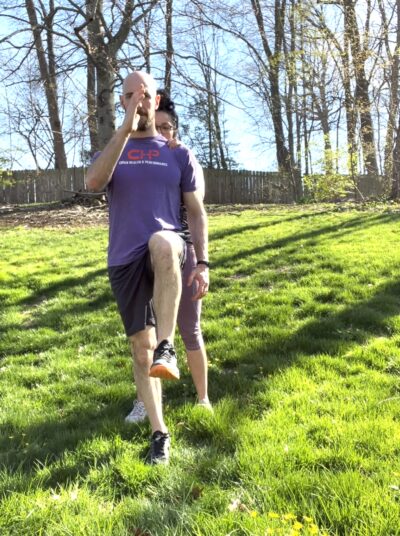
Attempt the drill below to feel what it is like to have a stacked posture while running.

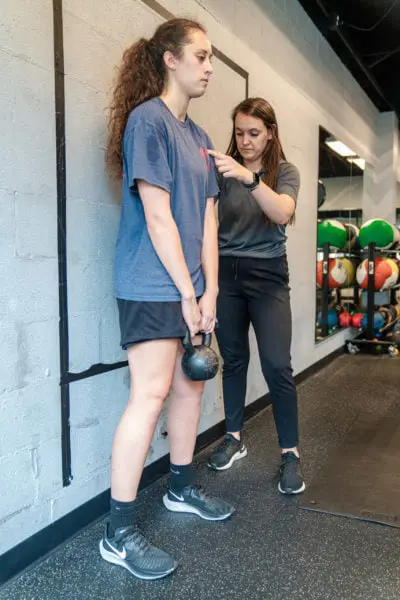
  • Grab a partner and ask him/her/they to stand behind you (you are also standing)
  • Have your partner press down on your shoulders with a moderate amount of force and do not let them squish you
  • As you resist them you should feel your abs engage and feel as if you are standing tall
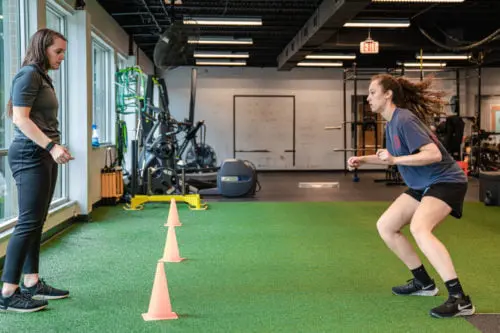
  • Next, attempt to shift your weight onto 1 leg and pick up your opposite foot while resisting the force of your partner
  • Try the other leg

For a video on this drill, click here.

After performing this drill, you should have a better sense of your optimal running posture. Try to replicate this feeling the next time you go on a run!

Secret to Avoiding Running Related Hamstring Injuries

Many runners and other athletes, like you, understand that strength training improves performance, reduces injury risk and decreases the likelihood that you will see us in physical therapy!

However, we have found that you may be strength training because you feel that you are supposed to but these workouts are more than simply checking a box.

It is important to think about how you are training a particular muscle group during your workout. This change in focus may be the secret to eliminating future hamstring injuries that cause many to look for a physical therapist.

Many people strengthen the hamstrings in a concentric (as the muscles shorten) fashion, however most hamstring strains occur as the muscles lengthen and work to slow down the swinging leg.

It is essential for any runner or athlete that performs a great deal of sprinting to develop a large amount of eccentric (muscle contraction that occurs as it lengthens) hamstring strength.

Eccentric hamstring curls are a great way to build this quality and the double leg variation on a physioball is a great place to start! Click here to see this exercise.

Once you have mastered the double leg eccentric glute bridge, it is time to step things up to the single leg progression.

How do you know if you are ready to move on? A great goal to shoot for on the double leg version is 10 FULL repetitions with a full 5 second lengthening period on each rep. The hips should not be dropping, and you should feel your abs throughout the set!

As we continue to build eccentric hamstring strength, this drill will add some additional challenges.

One leg will be flexed with the hip and knee at 90 degrees, mimicking a sprinting position. The result is one hip in a position of flexion while the other is in extension, much like sprinting or running. This will challenge your ability to control the position of the pelvis as you demonstrate hamstring strength.

Click here for the single leg progression!

Once you have mastered the single leg eccentric hamstring curl on a physioball, you can progress even further. To learn how to do that amongst other ways to optimize your strength training, click here.

Also, don’t forget to follow us on Instagram and facebook @cohenhealthandperformance!

Learn to Stack Like a Snowman

Learn to stack like a snowman….

The “stack” is one of the prerequisite positions to master in physical therapy or performance training. This position is essential for movements like squats, split squats, hip hinging and pretty much anything one might perform in the gym.

Think of the stack like a snowman. The 3 balls of a snowman represent the head (top ball), rib cage (middle ball), and pelvis (bottom ball). The goal of the stack is to center each of the 3 balls over one another.

The weight bearing surfaces of all 3 balls are larger when they are centered over one another. This means that the weight of the snowman is spread over a larger area (ie. less stress in each individual spot).

Now imagine that one ball starts to roll forward or backward. The ball above and below must roll with it to avoid falling to the ground and keep the snowman standing upright. This adjustment changes the weight bearing dynamics for each ball and more weight is now directed onto a smaller amount of space. This produces more stress onto these new weight bearing areas and may cause these areas to break down faster (think discs in our lower back).

This same dynamic happens in our body. As one of our balls (head, rib cage, or pelvis) rotates away from center, the other balls must accommodate. This places more stress onto the body as a whole and often results in discomfort.

Achieve the stack by practicing the following steps.

  1. Imagine that you are wearing pants with back pockets. Without bending your knees further, roll your back pockets underneath your body (you should feel your abs turn on)
  2. Without hunching over take a relaxed breath in, followed by a long and relaxed breath out. Feel your anterior ribs move down, back and in. Ensure that you can gently maintain this position while inhaling and exhaling
  3. Imagine that someone is standing behind you pressing hard down onto your shoulders. 

The stack can be a challenging position to master and integrate into your training routine. However it is often the secret to avoiding back pain with common activities in the gym. 

Contact us to learn other adjustments to common exercises that may become your hidden secret to overcoming pain and optimizing your performance.

Why Powerlifters Don’t Move Laterally

As most physical therapists will tell you, powerlifters typically do not demonstrate great multidirectional movement skills. Why would they?

Training for any sport is all about specificity.

The goal of a powerlifter is to squat, deadlift or bench press more weight. Their training reflects this and as a result, they become better at those lifts. Any movement qualities that do not contribute to helping perform in these lifts are likely to suffer because they are not useful to the sport.

In fact, any unnecessary movement may be detrimental to their sport because it takes energy away from what is most important.

One way to prevent unnecessary movements from occurring is to reduce the capability of doing so in the first place!

Elite level powerlifters often do not even possess the prerequisite movement capabilities to efficiently move laterally.  That wouldn’t be helpful to their performance!

The highest level of performance in any sport often requires physiological adaptations that set the body up for the greatest level of success in that specific activity. Many times, this means that unrelated movement capabilities will diminish.

While this is helpful for short term performance, when taken too far, a reduction in movement options can increase the risk for injury. A lack of movement capabilities results in a limited number of ways the body can minimize physical stress.

How do we know that the body has lost too many movement options? Overuse injuries begin to accumulate, and signs of discomfort start to present themselves.

The best solution for any athlete looking to improve their performance in particular sport is to visit a professional that can assess their capabilities and personal risk profile. Our team of Doctors of Physical Therapy at Cohen Health and Performance specializes in just that.

Contact us today to learn more!

Where You May Be Cheating Your Pushups (Video Included)

Let’s stop cheating our pushups and making the injury rehabilitation process more challenging! 

There is a simple way to make our pushups easier. Allow for your shoulder blades to pinch together and limit the motion’s range of motion . Less distance required for the push up=less effort. 

However, is this better for you?

Allowing your shoulder blades to pinch together excessively when performing a pushup places more strain onto the shoulder joint and may lead you to a physical therapy clinic like ours. Because the shoulder blades are pinched together, they are no longer able to move effectively and contribute to the exercise. More strain is placed onto the shoulder joint as it is forced to pick up the slack. 

Correcting this common compensation may prevent you from “repping out” the same number of pushups however you will get more out of the exercise. In addition, your shoulders will be healthier in long run!

The video below helps to illustrate this difference.

Video 1: The shoulder blades immediately come together.

Video 2: Begins by reaching away from the floor thus helping the shoulder blades to start in a more protracted (spread apart) position. From there they move slowly together as the body descends to the floor and spread apart again on the way back to the starting position.

What Is That Hip Pinch?

Have you ever experienced an annoying “pinchy” sensation in the front of your hip? Many patients are referred to physical therapy for other regions of the body (back pain being the most common) and mention this uncomfortable sensation in passing.

Typically this occurs with movements like deep squatting. This “pinch” occurs as the ball of the hip (the femoral head) glides forward excessively and presses against the soft tissues located in the front of the joint.

This forward movement is normal however it is important be mindful of where the socket of the joint (acetabulum) is positioned as well.

Often times, pinching occurs in the front of the hip due to a poorly positioned hip socket.

The good news is that we can reposition the hip socket so that your hip does not pinch as easily!

There are many great drills that help with this however the Shifted Single Leg 90/90 Hip Lift is a great one to start with (this is also a great movement to get the hips/pelvis moving before running). In this video, the left hip socket is being oriented into a position that will result in less pinching.

  1. Start by lying on your back with hips/knees bent at 90 degrees and feet on a wall
  2. Slowly pull your heels down towards the ground as you reach your knees towards the ceiling. Your tailbone will slowly lift off of the ground and you should begin feeling your hamstrings working.
  3. Without moving your feet, shift 1 hip/knee down as the other hip/knee shifts up. As you shift one hip/knee down, ensure that you are pulling towards the ground with that heel. You should feel that specific hamstring cooking at this point!
  4. Pick the opposite foot up off the wall while maintaining the hip shift
  5. Hold this position while taking a relaxed breath in through the nose, followed by a long exhale out through the mouth before pausing for 5 seconds. Perform this for 5 cycles.

As with all exercises, they should be specifically tailored to your particular needs and unique physical qualities. Schedule a FREE phone consultation with a member of our physical therapy team on our website to determine how to most effectively implement an exercise like this into your program!

×